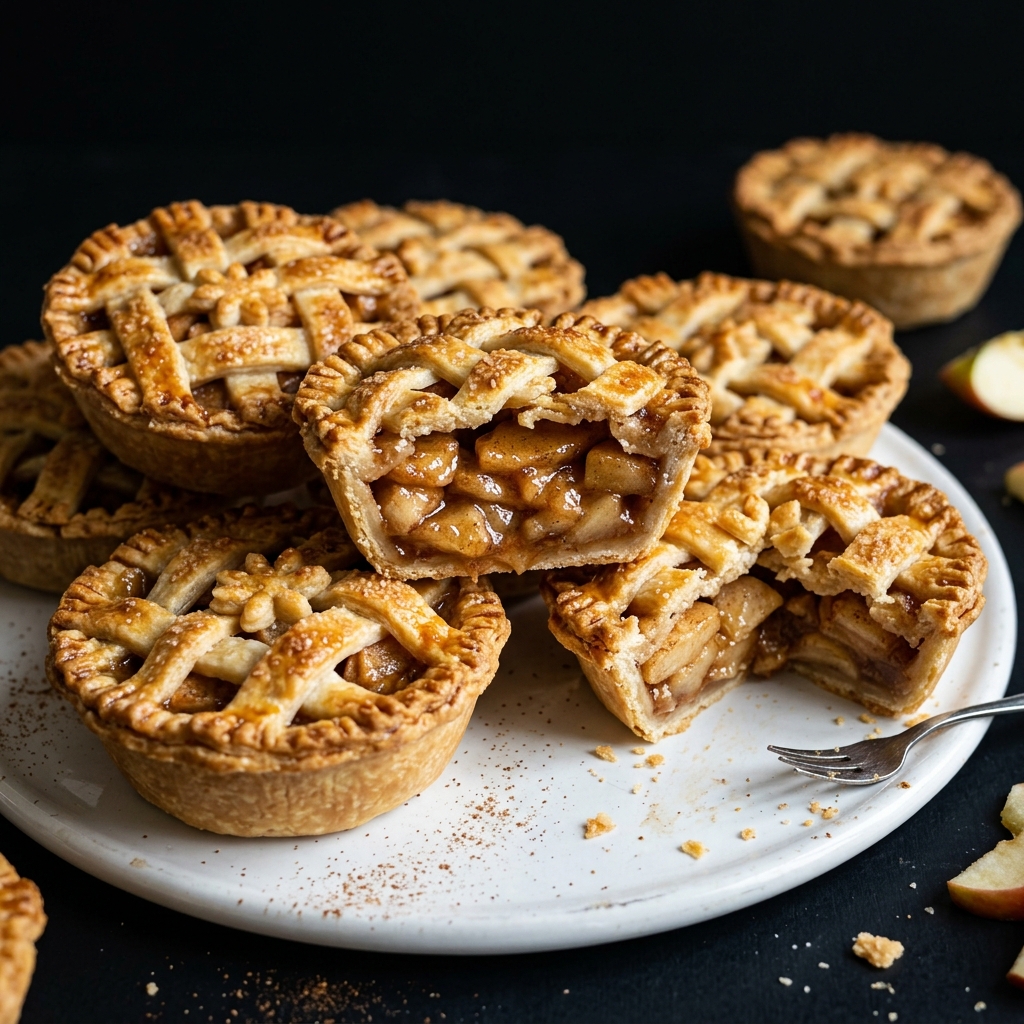
There is something wonderfully comforting about a freshly baked apple pie, but these Mini Apple Pies take that classic dessert and turn it into something even more special. Each little pie has a golden, flaky crust wrapped around tender cinnamon-spiced apples, giving you all the cozy flavor of traditional apple pie in a perfectly portioned dessert. They are beautiful enough for a holiday dessert table, simple enough for a weekend baking project, and portable enough for parties, potlucks, and family gatherings. Best of all, their individual size means everyone gets their own little pie, complete with crisp pastry edges and a warm, fragrant apple filling.
Ingredients for Mini Apple Pies

For the Pie Crust
- 2 ½ cups all-purpose flour – This provides the structure for the pastry. For the flakiest crust, measure the flour accurately rather than packing it tightly into the measuring cup.
- 1 cup unsalted butter, cold and cubed – Cold butter is one of the secrets to a tender, flaky crust. As the pies bake, the butter melts and creates delicate layers in the pastry.
- ½ teaspoon salt – Salt balances the sweetness and brings out the buttery flavor of the crust.
- 2 tablespoons granulated sugar – A small amount of sugar adds subtle sweetness and encourages beautiful browning.
- 6–8 tablespoons ice-cold water – Add this gradually until the dough just comes together. You may not need all of it.
For the Apple Filling
- 4–5 medium apples, peeled, cored, and diced or thinly sliced – Choose apples that hold their shape reasonably well during baking. A mixture of sweet and slightly tart apples gives the filling a more interesting flavor.
- ½ cup granulated sugar – Adds sweetness while allowing the natural apple flavor to remain noticeable.
- ¼ cup brown sugar – Brown sugar gives the filling a deeper, caramel-like flavor that works beautifully with cinnamon.
- 1 teaspoon ground cinnamon – The signature spice for classic apple pie.
- ¼ teaspoon ground nutmeg – Just enough to add warmth without overpowering the apples.
- 1 tablespoon lemon juice – Brightens the filling and helps balance the sweetness.
- 1 teaspoon vanilla extract – Adds a warm, rounded flavor.
- 2 tablespoons all-purpose flour or cornstarch – Helps thicken the juices released by the apples during baking so the filling stays inside the pastry instead of becoming watery.
- Pinch of salt – Enhances the sweetness and spices.
For Finishing
- 1 egg, beaten – Used as an egg wash to give the pastry a glossy, golden-brown finish.
- 1 tablespoon milk or water – Can be mixed with the egg for a lighter egg wash.
- Extra granulated sugar, optional – A light sprinkle over the crust adds a delicate crunch and an attractive bakery-style finish.
How to Make Mini Apple Pies
1. Prepare the Pie Dough
Start by combining the flour, sugar, and salt in a large mixing bowl. Add the cold cubed butter and work it into the flour using a pastry cutter, fork, or your fingertips.
The goal is not to completely blend the butter into the flour. You should still see small pieces of butter throughout the mixture. Some pieces can be about the size of peas. Those little pockets of butter are what help create flaky layers.
Gradually drizzle in the ice-cold water, mixing gently after each addition. Stop as soon as the dough begins to hold together when pressed. Avoid adding too much water because a wet dough can produce a tougher crust.
Turn the dough onto a lightly floured surface and gently bring it together. Divide it into two portions, flatten each portion into a disk, wrap them, and refrigerate for at least 30 minutes.
2. Prepare the Apple Filling
While the dough chills, prepare the apples. Peel, core, and slice or dice them into relatively small, evenly sized pieces.
Place the apples in a bowl and add the granulated sugar, brown sugar, cinnamon, nutmeg, lemon juice, vanilla extract, flour or cornstarch, and salt. Toss until every piece of apple is evenly coated.
Let the mixture sit for several minutes. This allows the sugar and spices to begin drawing out the apple juices and gives the flavors a chance to mingle.
For particularly juicy apples, avoid letting the filling sit for an excessively long time before assembling the pies. Too much accumulated liquid can make the pastry difficult to seal and can lead to a soggy bottom.
3. Prepare the Baking Pan
Preheat your oven to 375°F (190°C).
Lightly grease a standard muffin tin with butter or nonstick cooking spray. Make sure you coat the sides well because the pastry can caramelize slightly around the edges as it bakes.
If you are using individual mini pie molds, grease those instead and place them on a sturdy baking sheet for easier handling.
4. Roll Out the Dough
Remove one chilled dough disk from the refrigerator and place it on a lightly floured surface. Roll it out to approximately ⅛-inch thickness.
Use a round cookie cutter, biscuit cutter, or similarly sized bowl to cut circles large enough to fit into the muffin cups with enough dough extending slightly above the rim.
Gently press each pastry circle into the muffin cavity. Avoid stretching the dough as you work. Stretching can cause the crust to shrink during baking.
Place the prepared crusts in the refrigerator while you work with the remaining dough. Keeping the pastry cold helps maintain its texture.
5. Fill the Mini Pies
Spoon the apple mixture into each pastry shell, filling them generously but not excessively.
The apples will soften and settle during baking, so a slightly rounded mound is fine. However, avoid packing the filling down tightly. A little space allows steam to circulate and helps the apples cook evenly.
Try to distribute both the apple pieces and the thickened juices evenly rather than placing all the liquid into a few pies.
6. Add the Pastry Tops
Roll out the second dough disk and cut small circles for the tops. You can cover each pie completely and cut a few small vents in the center, or create a lattice design using thin strips of dough.
For an especially attractive presentation, cut tiny leaves, stars, hearts, or other shapes from leftover pastry and arrange them on top.
If using a full pastry top, press the edges gently against the bottom crust to seal them. Use a fork to create a decorative edge if desired.
Make sure every covered pie has at least one small opening for steam to escape. Without vents, steam can build up beneath the pastry and cause the top crust to crack or separate.
7. Brush and Bake
Brush the tops lightly with beaten egg mixed with a little milk or water. Be careful not to allow a large amount of egg wash to pool around the edges.
For an extra attractive finish, sprinkle a small amount of granulated sugar over the tops.
Place the muffin tin in the preheated oven and bake for approximately 25–35 minutes, or until the pastry is deeply golden and the apple filling is bubbling.
Because ovens vary, begin checking toward the lower end of the baking time. The crust should look fully baked and golden rather than pale or doughy.
8. Cool Before Serving
Allow the mini pies to cool in the pan for about 10–15 minutes before carefully removing them.
This step is more important than it may seem. The apple filling will be extremely hot immediately after baking, and it continues to thicken as it cools. Removing the pies too quickly can cause the filling to spill out or the crust to break.
Transfer them to a wire rack and let them cool further if you want cleaner, more defined individual pies.
The Little Details That Make These Pies Exceptional
A great apple pie is not simply about putting apples inside pastry. The difference between an average pie and one that people remember often comes down to a handful of small details. Keeping the butter cold, avoiding overworking the dough, choosing flavorful apples, and controlling the amount of moisture in the filling all have a major impact on the final texture.
Another important detail is the balance between sweetness and acidity. Apples naturally vary in sweetness, so blindly adding large amounts of sugar can sometimes overwhelm their flavor. Lemon juice provides a small but important contrast, while cinnamon and nutmeg add warmth without making the filling taste heavily spiced.
The best result is a filling that tastes distinctly like apples first, with brown sugar, cinnamon, butter, and vanilla supporting that flavor rather than hiding it.
Choosing the Best Apples for Mini Apple Pies
The apples you choose can completely change the finished dessert. For a classic flavor, consider using a combination of sweet and tart apples rather than relying on only one variety.
Tart apples can provide brightness and structure, while sweeter apples contribute natural sugars and a softer, richer flavor. Combining varieties can also create a more complex filling because different apples soften at slightly different rates.
Whichever apples you choose, avoid using pieces that are dramatically different in size. Thin pieces may become very soft while large chunks remain firm. Cutting the apples into evenly sized slices or small chunks helps every bite cook more consistently.
Delicious Variations to Try
Caramel Mini Apple Pies
For an extra indulgent version, add a small spoonful of thick caramel sauce to the apple filling before placing on the pastry top. You can also drizzle a little caramel over the cooled pies before serving.
Apple Crumble Mini Pies
Instead of covering the apples with a traditional pastry top, add a buttery oat crumble made with oats, flour, brown sugar, cinnamon, and butter. The result combines the best qualities of apple pie and apple crumble.
Cinnamon Streusel Mini Pies
For an especially crunchy topping, replace the pastry lid with cinnamon streusel. The contrast between the tender apples and crisp topping makes these particularly appealing when served warm.
Cheddar Apple Mini Pies
If you enjoy the classic combination of apple pie and cheese, add a small amount of finely shredded sharp cheddar to the filling or incorporate cheddar into the pastry dough. The salty, savory cheese creates an interesting contrast with the sweet apples.
Nutty Apple Mini Pies
Add finely chopped pecans or walnuts to the filling for extra texture. Keep the quantity moderate so the nuts complement rather than overpower the apples and pastry.
Expert Tips for Better Mini Apple Pies
Keep the butter cold. Warm butter can blend too thoroughly into the flour and reduce the flaky texture. If your kitchen is warm, refrigerate the dough whenever it begins to feel soft.
Do not overwork the dough. The more you knead pastry dough, the more gluten develops. Handle it gently and stop once it comes together.
Do not skip the chilling step. Chilled dough is easier to handle and less likely to shrink dramatically during baking.
Control the filling moisture. Apples release juice as they bake. Using a small amount of flour or cornstarch helps create a thicker filling that stays inside the pie.
Vent the tops. Even tiny pies produce steam. A few decorative openings prevent pressure from building underneath the crust.
Use an egg wash sparingly. A thin, even coating produces a beautiful golden finish. Too much can make the surface look heavy or uneven.
Let them rest. Freshly baked apple filling is extremely hot and loose. Giving the pies time to cool allows the filling to thicken and makes them easier to eat.
Bake for color, not just the clock. The exact baking time can vary depending on your oven, the size of your pies, and the moisture in your apples. Look for a deeply golden crust and bubbling filling as your best indicators of doneness.
Make-Ahead Options
These Mini Apple Pies are excellent for preparing ahead, especially when you are planning a holiday meal, dinner party, birthday gathering, or weekend brunch.
You can prepare the pie dough up to 2 days ahead and keep it tightly wrapped in the refrigerator. Let it sit at room temperature for a few minutes before rolling if it becomes very firm.
The apple filling can also be prepared several hours ahead and refrigerated in an airtight container. For the best pastry texture, however, avoid assembling the pies too far in advance unless you plan to freeze them.
For longer storage, assemble the unbaked mini pies and freeze them until solid. Once frozen, transfer them to a freezer-safe container or bag. They can generally be baked directly from frozen, although you may need to add several minutes to the baking time. Brush with egg wash just before baking rather than before freezing for the best finish.
Preparing the components ahead of time is particularly useful when entertaining because most of the work can be completed before guests arrive. You can then bake the pies closer to serving time so the kitchen fills with the irresistible aroma of warm cinnamon apples and buttery pastry.
What to Serve With Mini Apple Pies
These little pies are delicious on their own, but the right accompaniment can turn them into a truly memorable dessert.
Vanilla Ice Cream
A scoop of creamy vanilla ice cream is perhaps the most classic pairing. The cold, silky ice cream begins melting over a warm apple pie, creating a wonderful contrast between temperatures and textures.
Whipped Cream
For a lighter option, add a generous spoonful of freshly whipped cream. Its delicate sweetness allows the cinnamon apple filling to remain the star.
Caramel Sauce
Warm caramel sauce pairs beautifully with apples and brown sugar. Drizzle a small amount over each mini pie immediately before serving.
Cinnamon Sugar
For a simple finishing touch, lightly dust the pies with cinnamon sugar once they have cooled. This adds fragrance and a subtle crunch.
Warm Custard
A spoonful of vanilla custard or crème anglaise makes these individual pies feel particularly elegant and suitable for a dinner-party dessert.
Coffee or Tea
For an afternoon treat, serve the pies alongside freshly brewed coffee, black tea, chai, or a warm cinnamon-spiced tea. The spices in the drink complement the apple filling beautifully.
How to Store Mini Apple Pies
Allow the pies to cool completely before storing them. Placing warm pastries into a sealed container can trap steam, causing the crust to become soft.
For short-term storage, place the cooled pies in an airtight container and refrigerate them for approximately 3–4 days.
If you prefer to enjoy them warm, reheat individual pies in a conventional oven or toaster oven until heated through. This helps restore some of the crispness that can be lost during refrigeration.
Avoid relying on the microwave if you want a crisp crust. Although it reheats the filling quickly, the pastry can become soft.
Can You Freeze Baked Mini Apple Pies?
Yes. Once completely cooled, wrap each pie individually in plastic wrap or another freezer-safe wrapping material and place them in an airtight freezer container.
They can be frozen for approximately 2–3 months for the best quality.
When ready to serve, thaw them in the refrigerator and reheat them in the oven until warm and crisp. You can also reheat some pies directly from frozen, but allow additional time for the centers to become hot.
Frequently Asked Questions
Can I make Mini Apple Pies without a muffin tin?
Absolutely. A muffin tin is convenient because it creates evenly shaped individual pies, but it is not essential. Small individual pie dishes, ramekins designed for baking, or mini tart pans can also work.
The important thing is to adjust the amount of dough and filling according to the size of your baking vessel. Larger molds will require more filling and may need a longer baking time.
Why are my Mini Apple Pies soggy on the bottom?
A soggy bottom can happen for several reasons. The most common causes are excessive moisture from the apples, underbaking, or allowing the raw pastry to sit with a very wet filling for too long before baking.
Use a suitable thickener, avoid adding excessive liquid to the filling, and make sure the pastry is fully baked before removing the pies from the oven. Keeping the dough cold also helps it bake into a better-textured crust.
Should I cook the apples before putting them into the pies?
You do not necessarily need to precook the apples. Thinly sliced or finely diced apples can cook successfully inside the pastry while the pies bake.
However, if you are using particularly firm apple varieties or want a very soft, jammy filling, briefly cooking the apple mixture beforehand can give you more control over the final texture.
If you precook the filling, allow it to cool before placing it into the pastry. Hot filling can soften the butter in the dough and make the crust harder to handle.
What is the best apple for Mini Apple Pies?
There is no single perfect apple. A combination of sweet and tart apples often produces the most balanced result.
Look for apples that have good flavor and maintain some structure during baking. Combining different varieties can provide a better balance of sweetness, acidity, texture, and aroma than using only one type.
Can I make these Mini Apple Pies gluten-free?
Yes, but you will need to replace the regular all-purpose flour in the pastry with a suitable gluten-free baking flour blend formulated for pie crusts.
Because gluten-free dough can behave differently from traditional pastry, follow the instructions for the particular flour blend you use. You may also need to adjust the amount of liquid.
Can I make Mini Apple Pies vegan?
Traditional pie crust contains butter, but you can make a vegan version by replacing the butter with a suitable plant-based butter or vegan baking fat.
The egg wash can also be replaced with a plant-based alternative such as nondairy milk or another suitable pastry wash. Always check ingredient labels if you are preparing the pies for someone with strict dietary requirements.
How do I prevent the crust from shrinking?
Start with properly chilled dough and avoid stretching it when pressing it into the baking pan. Stretching creates tension in the pastry, which can cause it to pull back during baking.
Another helpful technique is to chill the shaped pastry shells before filling them. Keeping the dough cold gives the butter a better chance of maintaining its structure in the oven.
Can I use store-bought pie crust?
Yes. Store-bought pie crust is a convenient shortcut when you want homemade-style Mini Apple Pies without making pastry from scratch.
The finished flavor and texture will depend on the brand, but using a quality refrigerated pie crust can save considerable preparation time. It is also a practical option when making a large batch for a gathering.
How do I know when the Mini Apple Pies are done?
Look for several signs rather than relying only on the timer. The pastry should be visibly golden brown, the edges should look fully baked, and the apple filling should be bubbling.
If the crust is still pale, it generally needs more time. If the tops are browning too quickly while the filling needs more cooking, loosely cover the tops with foil and continue baking.
A Few Final Words Before You Bake
Mini Apple Pies prove that a dessert does not have to be complicated to feel special. With a flaky homemade crust, fragrant cinnamon apples, and a beautiful golden finish, these little pies capture everything people love about traditional apple pie while making it easier and more fun to serve.
The real secret is patience. Keep the pastry cold, treat the dough gently, give the apples enough room to cook, and allow the finished pies to rest before serving. Those simple techniques can make the difference between an ordinary batch and the kind of dessert people immediately ask you to make again.
And do not be afraid to make them your own. Try a caramel drizzle for extra richness, add pecans for crunch, experiment with different apple varieties, or finish each warm pie with a scoop of vanilla ice cream. Once you have mastered the basic recipe, these Mini Apple Pies become a wonderfully flexible dessert for almost any occasion.
Whether you are baking for Thanksgiving, a holiday gathering, a family dinner, a bake sale, or simply craving a comforting homemade dessert, these individual apple pies are guaranteed to bring plenty of warmth to the table. The combination of crisp golden pastry and tender cinnamon apples is timeless—and when each person gets their own little pie, that classic dessert becomes even more irresistible.

Mini Apple Pies
Ingredients
Equipment
Method
- Make the dough: Combine flour, sugar, and salt. Cut in the cold butter until the mixture contains small, pea-sized pieces of butter. Gradually add ice-cold water until the dough just comes together.
- Chill the dough: Gently bring the dough together without overworking it. Divide into two disks, wrap, and refrigerate for 30 minutes.
- Prepare the filling: Combine the apples, granulated sugar, brown sugar, cinnamon, nutmeg, lemon juice, vanilla, flour or cornstarch, and salt. Toss until evenly coated.
- Preheat the oven: Heat the oven to 375°F (190°C). Lightly grease a standard muffin tin or individual mini pie molds.
- Roll the dough: Roll one chilled dough disk to about ⅛-inch thickness. Cut circles large enough to fit into the muffin cups and gently press the pastry into each cavity without stretching it.
- Fill the pies: Spoon the apple mixture into each pastry shell, distributing the apples evenly. Do not overfill.
- Add the tops: Roll out the remaining dough and cut circles or strips for the pie tops. Create full pastry tops, lattice tops, or decorative shapes. Seal the edges and cut small vents into covered pies.
- Apply the egg wash: Mix the beaten egg with milk or water and lightly brush over the pastry. Sprinkle with granulated sugar if desired.
- Bake: Bake for 25–35 minutes, or until the crust is golden brown and the apple filling is visibly bubbling.
- Cool: Let the pies rest in the pan for 10–15 minutes before carefully transferring them to a wire rack. Allow them to cool further so the filling can thicken.
Notes
Do not overwork the dough, as this can make the crust tough.
Choose a mixture of sweet and slightly tart apples for a more balanced filling.
If your apples are particularly juicy, use the full amount of flour or cornstarch to help control excess moisture.
Make sure to vent covered pies so steam can escape.
Allow the pies to cool before removing them from the pan to prevent the filling from spilling out.
Serve warm with vanilla ice cream, whipped cream, caramel sauce, or a dusting of cinnamon sugar.
Store cooled pies in an airtight container in the refrigerator for 3–4 days.
For longer storage, baked pies can be frozen for approximately 2–3 months.

Hi, I’m Clara, the creator of Barakala. I love sharing simple, comforting, and delicious recipes that make everyday cooking easier and more enjoyable for home cooks.