
There is something irresistible about a beautifully made Black Forest Cake: deep, moist chocolate cake layered with clouds of whipped cream, juicy cherries, and delicate chocolate shavings in every bite. This classic dessert looks impressive enough for a celebration but can be made at home with the right technique, and this recipe walks you through exactly how to get those rich chocolate layers, balanced cherry flavor, and creamy finish just right.
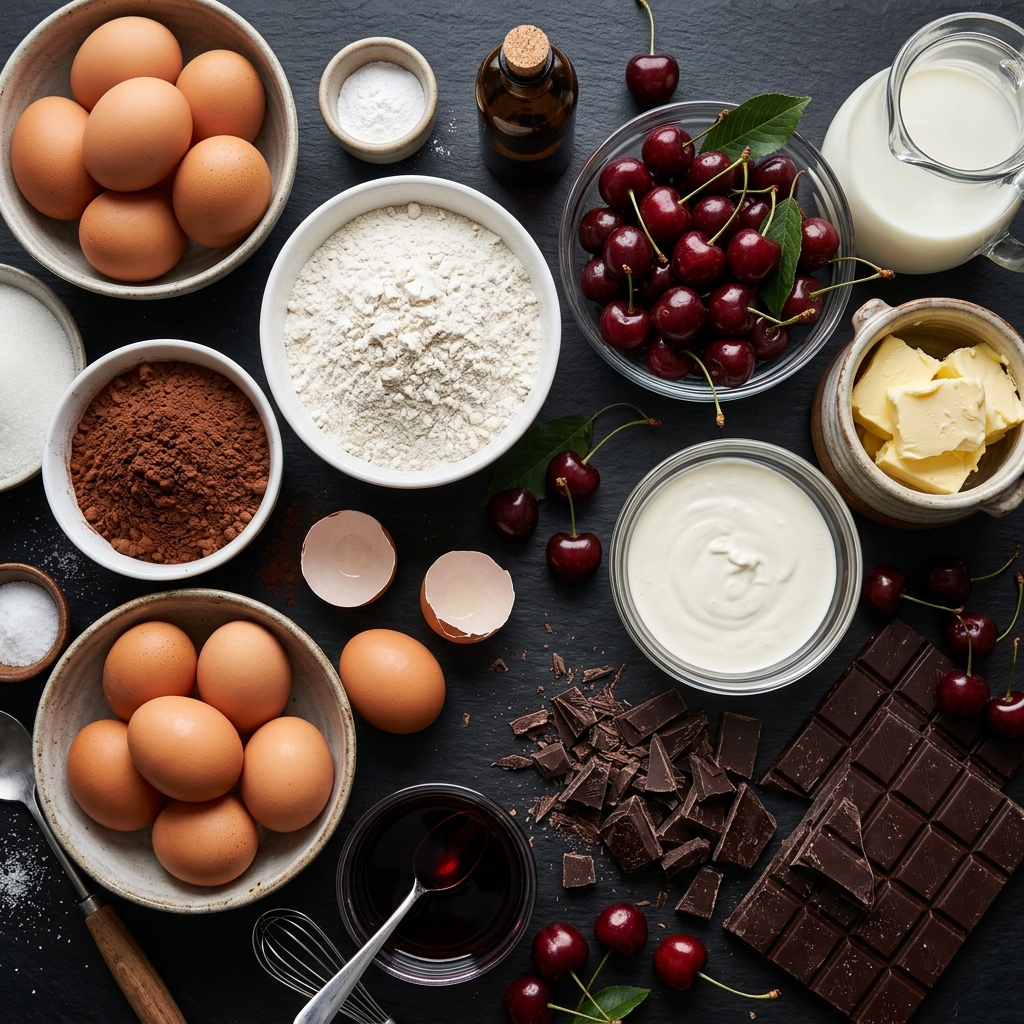
Ingredients for Black Forest Cake
A great Black Forest Cake is all about balance. The chocolate cake should be rich without becoming heavy, the cherries should provide brightness and a little tartness, and the whipped cream should be light enough to keep every bite from feeling overly sweet.
For the Chocolate Cake
- 2 cups all-purpose flour
- 1 ¾ cups granulated sugar
- ¾ cup unsweetened cocoa powder
- 2 teaspoons baking powder
- 1 ½ teaspoons baking soda
- 1 teaspoon salt
- 2 large eggs, room temperature
- 1 cup buttermilk
- ½ cup vegetable oil
- 2 teaspoons pure vanilla extract
- 1 cup hot water or hot brewed coffee
Why use hot coffee? Coffee is not meant to make the cake taste like coffee. Instead, it intensifies the natural flavor of the cocoa and gives the chocolate cake a deeper, more sophisticated taste. If you prefer not to use coffee, hot water works perfectly well.
The hot liquid also helps hydrate the cocoa powder, which can contribute to a darker, more flavorful chocolate crumb.
For the Cherry Filling
- 2 cups pitted dark sweet cherries, fresh or frozen
- ½ cup granulated sugar
- 2 tablespoons cherry juice or water
- 1 tablespoon cornstarch
- 1 tablespoon lemon juice
- 1 teaspoon vanilla extract
If fresh cherries are in season, they are an excellent choice. Frozen cherries are also convenient and often work beautifully because they are harvested when ripe. If using frozen cherries, there is no need to thaw them completely before cooking.
For the most traditional flavor, sour cherries can also be used. Their natural tartness creates an especially pleasant contrast with the sweet chocolate cake and whipped cream.
For the Whipped Cream Frosting
- 3 cups cold heavy whipping cream
- ½ cup powdered sugar
- 2 teaspoons pure vanilla extract
Keep the cream thoroughly chilled until you are ready to whip it. Cold cream traps air more effectively and produces a more stable, fluffy texture.
For an especially stable cake, you can add a small amount of instant clear gelatin or another whipped-cream stabilizer according to the manufacturer’s directions. This is particularly helpful if the cake will sit out for an extended period.
For the Chocolate and Cherry Decoration
- ½ cup dark chocolate, finely shaved or grated
- 12 to 16 fresh cherries with stems, for garnish
- Optional: a few tablespoons of cherry syrup for brushing the cake layers
Use good-quality dark chocolate if possible. Since the chocolate is used as a visible finishing ingredient, its flavor and texture will have a noticeable effect on the finished dessert.
How to Make Black Forest Cake
1. Prepare the Cake Pans
Preheat your oven to 350°F (175°C).
Grease three 8-inch round cake pans and line the bottoms with parchment paper. Lightly grease the parchment as well.
If you only have two cake pans, you can divide the batter between them and bake the layers slightly longer, then carefully slice each cake horizontally once cooled to create four thinner layers. However, three pans make the process easier and produce a classic three-layer presentation.
2. Mix the Dry Ingredients
In a large mixing bowl, whisk together the flour, sugar, cocoa powder, baking powder, baking soda, and salt.
Take a moment to whisk thoroughly. This does more than simply combine the ingredients. It helps distribute the leavening agents and cocoa evenly so that you do not end up with pockets of baking soda or dense sections of cocoa in the finished cake.
If your cocoa powder is particularly lumpy, sift it before adding it to the bowl.
3. Add the Wet Ingredients
Add the eggs, buttermilk, vegetable oil, and vanilla extract to the dry ingredients.
Mix until the batter is smooth and evenly combined. Do not worry if it looks somewhat thin at this stage. Chocolate cakes made with hot liquid often have a considerably looser batter than traditional butter cakes.
This thinner consistency is one of the reasons the finished cake can be exceptionally moist.
4. Add the Hot Liquid
Slowly pour in the hot water or hot coffee while mixing on low speed.
Continue mixing just until everything is incorporated.
The batter will become quite thin. That is completely normal.
Avoid overmixing once the flour has been hydrated. Excessive mixing can encourage gluten development, which may make the cake less tender.
5. Bake the Chocolate Layers
Divide the batter evenly among the prepared pans.
Bake for approximately 22 to 28 minutes, or until a toothpick inserted into the center comes out with a few moist crumbs attached.
Do not wait for the toothpick to come out completely dry. A completely dry tester can indicate that the cake has been baked too long.
Once baked, allow the cakes to cool in their pans for about 10 minutes. Carefully run a thin knife around the edges, then turn the cakes onto wire racks.
Remove the parchment paper and allow the layers to cool completely.
The cakes must be completely cool before assembly. Warm cake can melt the whipped cream and cause the entire dessert to become unstable.
6. Prepare the Cherry Filling
While the cake cools, prepare the cherry filling.
Place the cherries, sugar, cherry juice or water, and lemon juice in a saucepan over medium heat.
Cook gently until the cherries begin to soften and release their juices.
In a small bowl, mix the cornstarch with a little cold water to create a smooth slurry. Add it to the cherries while stirring.
Continue cooking for another 1 to 2 minutes, or until the mixture thickens.
Remove from the heat and stir in the vanilla extract.
Allow the cherry filling to cool completely before assembling the cake.
The filling should be thick enough to sit between the layers without running down the sides. If it is too loose, the cake can slide as you stack it.
7. Make the Whipped Cream
Pour the cold heavy cream into a large chilled mixing bowl.
Add the powdered sugar and vanilla extract.
Beat with an electric mixer on medium speed until soft peaks form, then continue briefly until medium-stiff peaks form.
Be careful not to overwhip the cream. Once cream moves beyond the ideal stage, it can become grainy and eventually turn into butter.
The finished whipped cream should hold its shape but remain smooth, soft, and spreadable.
8. Level the Cake Layers
Once the chocolate cakes are completely cool, inspect the tops.
If they have domed during baking, use a long serrated knife to carefully level them.
Try to remove only the amount necessary to create flat surfaces. Those trimmed pieces are not wasted; they can be saved for snacking, cake crumbs, or decoration.
For an especially polished Black Forest Cake, the layers should be as level as possible. Uneven layers can make the cake lean once the filling and cream are added.
9. Begin the Cake Assembly
Place the first chocolate cake layer on a cake board, serving plate, or modern white cake stand.
If desired, lightly brush the surface with a little cherry syrup. Do not soak the cake excessively. You want additional moisture and cherry flavor, not a soggy layer.
Spread a layer of whipped cream over the cake.
Spoon some of the cooled cherry filling over the cream, keeping it slightly away from the very edge.
This small border is important. It helps prevent the cherry filling from squeezing out when the next cake layer is placed on top.
10. Add the Remaining Layers
Place the second chocolate cake layer over the filling.
Repeat the process with cherry syrup, whipped cream, and cherry filling.
Add the final chocolate cake layer with the cut side facing down if it is level and smooth.
Gently press the cake into place without applying too much pressure.
At this stage, step back and check the cake from several angles. If it is beginning to lean, gently adjust the layers before continuing.
11. Frost the Cake
Cover the top and sides of the cake with the remaining whipped cream.
You do not need to make the frosting perfectly smooth. A softly textured finish gives Black Forest Cake its classic homemade appearance and allows the chocolate and cherries to become part of the decoration.
For a cleaner bakery-style finish, use an offset spatula or cake scraper to smooth the sides.
12. Finish With Chocolate and Cherries
Press dark chocolate shavings or curls around the sides and over the top of the cake.
Finish with fresh cherries arranged around the top.
For a dramatic presentation, place several cherries with their stems intact around the top edge.
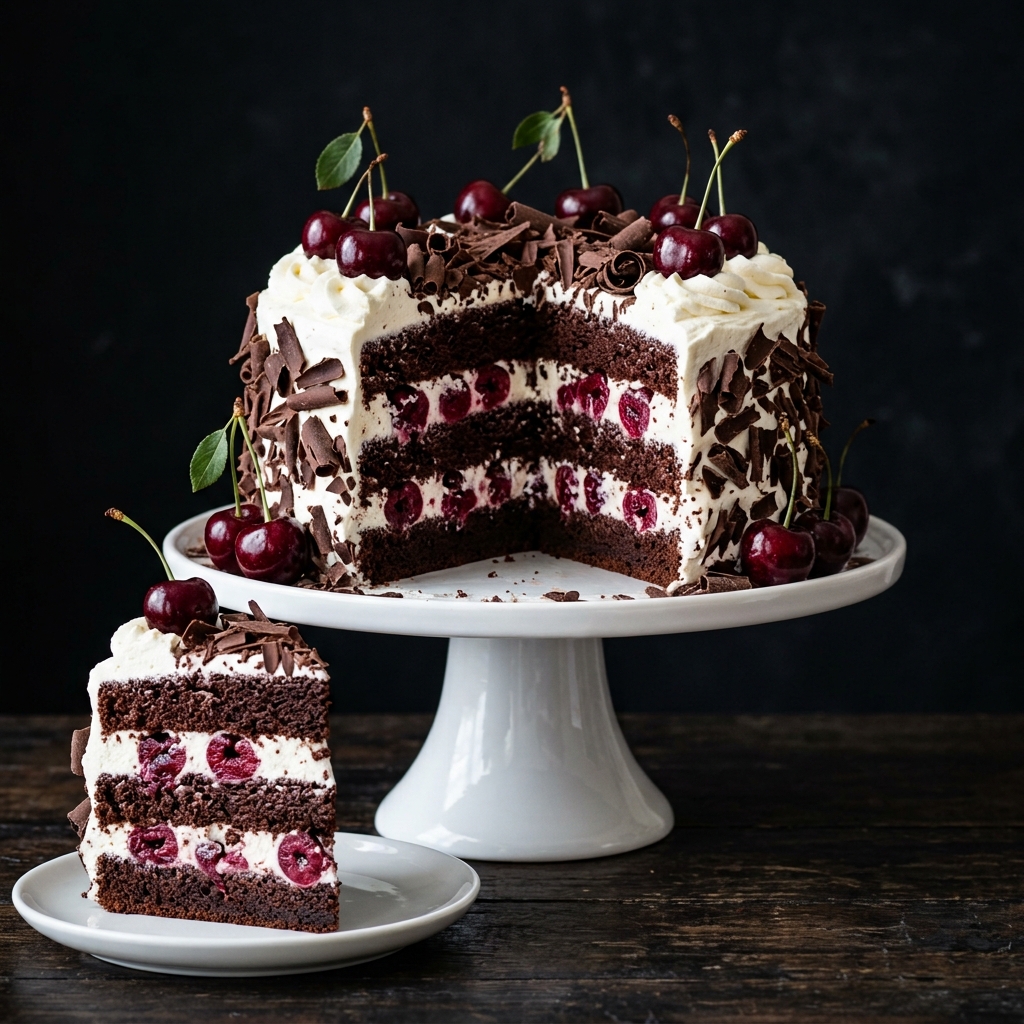
The combination of white whipped cream, dark chocolate, and vibrant red cherries creates the signature appearance that makes this cake so visually appealing.
Before slicing, refrigerate the assembled cake for at least 1 hour. This gives the cream time to firm up and allows the layers to settle together.
The Secret to a Truly Moist Black Forest Cake
One of the biggest differences between an ordinary chocolate cake and an exceptional Black Forest Cake is moisture.
The chocolate sponge should be soft enough to cut easily with a fork but sturdy enough to support multiple layers of cream and cherries. Using oil rather than relying entirely on butter helps keep the cake moist, while buttermilk adds tenderness and a subtle tang.
The optional cherry syrup takes that texture even further. A light brushing between the layers allows the chocolate sponge to absorb cherry flavor while remaining pleasantly moist.
The key word is light. Too much syrup can make the layers wet and difficult to handle.
Another important detail is the temperature of the ingredients during assembly. The cake must be completely cool, the cherry filling should be chilled or at least cool to the touch, and the whipped cream should remain cold. These three details make a tremendous difference in the stability of the finished dessert.

What Makes Black Forest Cake So Special?
The magic of Black Forest Cake comes from contrast. The chocolate cake brings richness and depth, cherries add brightness and acidity, and whipped cream provides a cool, delicate texture that ties everything together.
It is also a dessert where presentation matters almost as much as flavor. When you cut into the finished cake, you should see distinct layers of dark chocolate sponge, pale cream, and jewel-like cherries. That contrast makes every slice look special before anyone has even taken a bite.
The best version is not necessarily the sweetest one. A balanced Black Forest Cake should allow you to taste the cocoa, cream, cherries, and chocolate separately while still enjoying them as one dessert.
Variations of Black Forest Cake
Black Forest Cupcakes
Turn the same flavor combination into individual desserts by preparing chocolate cupcakes instead of cake layers.
Fill the cooled cupcakes with cherry filling, pipe whipped cream over the top, and finish with chocolate shavings and a cherry.
These are excellent for parties because guests can enjoy individual portions without needing to slice a large cake.
Black Forest Sheet Cake
For a simpler presentation, bake the chocolate cake in a rectangular pan.
Spread the cherry filling and whipped cream over the cooled cake, then finish with chocolate shavings and cherries.
This version is particularly convenient when serving a crowd because it requires less assembly and is easy to portion.
Black Forest Cheesecake Cake
For an extra-decadent dessert, add a thin layer of vanilla or chocolate cheesecake between the chocolate cake layers.
The cheesecake introduces a rich, creamy contrast to the cherries and makes the dessert particularly substantial.
Mini Black Forest Cakes
Create small individual cakes by cutting rounds from a baked chocolate sheet cake.
Layer each round with whipped cream and cherry filling, then decorate individually with chocolate curls and a cherry.
This is a beautiful option for dinner parties or special celebrations where presentation is important.
White Chocolate Black Forest Cake
Replace some of the dark chocolate decoration with white chocolate curls.
The white chocolate creates a striking visual contrast against the dark cake and red cherries while adding a sweeter, creamier chocolate note.
Expert Tips for the Best Black Forest Cake
Use Room-Temperature Eggs
Room-temperature eggs incorporate more easily into the batter and help create a more uniform cake texture.
Don’t Overbake the Chocolate Cake
This is one of the easiest ways to ruin an otherwise excellent Black Forest Cake.
Start checking the cake near the lower end of the recommended baking time. A few moist crumbs on a toothpick are preferable to a completely dry tester.
Cool Every Component Before Assembly
This deserves repeating. Warm cake plus warm cherry filling plus whipped cream is a recipe for a sliding cake.
Allow every component to cool properly before assembling.
Keep the Cherry Filling Thick
A runny filling can escape from between the layers and make the cake unstable.
Cook the filling until it has a spoonable consistency, then allow it to cool completely.
Don’t Overwhip the Cream
Stop once the cream forms firm but smooth peaks.
Grainy whipped cream will not give the cake the luxurious texture you want.
Chill Before Decorating
After assembling the layers, refrigerate the cake before completing the final decoration if the cake feels soft.
A short chilling period makes the structure easier to handle and gives you cleaner edges.
Use a Serrated Knife for Slicing
A sharp serrated knife makes it easier to cut through the chocolate sponge, cream, and cherries without compressing the layers.
Wipe the blade clean between slices for especially neat servings.
Make Ahead Options
Black Forest Cake is an excellent make-ahead dessert.
The chocolate cake layers can be baked a day or two in advance. Once completely cool, wrap them tightly in plastic wrap and store them at room temperature for a day or refrigerate them for longer storage.
The cherry filling can also be prepared ahead of time and refrigerated in an airtight container.
For the best texture, prepare the whipped cream relatively close to assembly time. Once the cake is assembled, refrigerate it until serving.
You can also assemble the entire cake several hours before serving. In fact, a little resting time in the refrigerator can improve the finished dessert because the flavors have time to mingle and the layers become easier to slice.
What to Serve With Black Forest Cake
Black Forest Cake is rich enough to stand on its own, but a few simple accompaniments can make the dessert experience even better.
Fresh Cherries
Serve additional fresh cherries alongside each slice for a bright, juicy contrast.
Coffee
A cup of freshly brewed coffee works beautifully with the deep cocoa flavor of the cake and helps balance the sweetness.
Espresso
For a more intense pairing, serve a small espresso alongside the cake.
Vanilla Ice Cream
A small scoop of vanilla ice cream adds another creamy element and is especially appealing when the cake is served slightly chilled.
Hot Chocolate
For an indulgent dessert spread, pair the cake with a simple cup of hot chocolate. The combination creates an especially rich chocolate-forward treat.
How to Store Black Forest Cake
Because this cake contains whipped cream and a fruit filling, it should be refrigerated.
Place the finished cake in a cake carrier or cover it carefully with a cake dome to prevent it from absorbing refrigerator odors.
Store it in the refrigerator and enjoy it within approximately 3 days for the best texture and flavor.
Keep the cake chilled until shortly before serving. Avoid leaving it at room temperature for prolonged periods, particularly in a warm environment.
If you need to store individual slices, place them in airtight containers and refrigerate them. Separate layers with parchment paper if stacking is necessary.
For longer storage, the baked chocolate cake layers can be frozen before assembly. Wrap each cooled layer tightly, place it in a freezer-safe container or bag, and freeze for up to about 2 months. Thaw the layers in the refrigerator before assembling the cake.
Frequently Asked Questions
Can I use frozen cherries for Black Forest Cake?
Yes. Frozen cherries are a convenient alternative to fresh cherries and work particularly well in the cooked cherry filling. They may release more liquid as they cook, so allow the filling to thicken properly before cooling it.
Does Black Forest Cake need to be refrigerated?
Yes. Because it contains whipped cream and a fruit-based filling, refrigeration is important for both food safety and texture. Keep the assembled cake chilled until serving.
Can I make Black Forest Cake without alcohol?
Absolutely. Traditional versions can include cherry liqueur, but it is not necessary. This recipe uses cherry juice or syrup to provide cherry flavor without alcohol.
Why is my Black Forest Cake sliding?
The most common reasons are overly loose cherry filling, whipped cream that is too soft, warm cake layers, or too much filling between the layers. Make sure every component is cool and that the cherry filling is thick before assembly.
Can I make the cake the day before?
Yes. Black Forest Cake is well suited to making ahead. Prepare and assemble the cake the day before, then refrigerate it in a covered cake carrier. The resting time can actually help the flavors come together.
How do I get clean slices?
Chill the cake thoroughly before cutting. Use a sharp serrated knife and gently saw through the layers rather than pressing straight down. Wipe the knife clean between cuts for the neatest presentation.

Black Forest Cake
Ingredients
Equipment
Method
- Preheat the oven to 350°F (175°C). Grease three 8-inch round cake pans and line the bottoms with parchment paper.
- Whisk together the flour, sugar, cocoa powder, baking powder, baking soda, and salt in a large bowl.
- Add the eggs, buttermilk, vegetable oil, and vanilla extract. Mix until just combined.
- Slowly pour in the hot water or hot coffee while mixing on low speed. Mix only until the batter is smooth. The batter will be thin, which is normal.
- Divide the batter evenly between the prepared pans. Bake for 22–28 minutes, or until a toothpick inserted in the center comes out with a few moist crumbs.
- Cool the cakes in their pans for about 10 minutes, then transfer them to wire racks and cool completely.
- Add cherries, sugar, cherry juice or water, and lemon juice to a saucepan over medium heat. Cook until the cherries soften and release their juices.
- Mix the cornstarch with a little cold water to make a smooth slurry. Stir it into the cherries and cook for 1–2 minutes, until thickened. Remove from the heat and stir in vanilla. Cool completely.
- Beat the cold heavy cream, powdered sugar, and vanilla extract until smooth and medium-stiff peaks form. Do not overwhip.
- If necessary, use a serrated knife to carefully level the tops of the cooled cake layers.
- Place the first cake layer on a serving plate or cake stand. Lightly brush with cherry syrup if desired.
- Spread a layer of whipped cream over the cake, then spoon some cherry filling over the cream. Keep the filling slightly away from the edge.
- Repeat with the second cake layer.
- Place the final cake layer on top. Cover the top and sides with the remaining whipped cream.
- Decorate generously with dark chocolate shavings and fresh cherries.
- Refrigerate the assembled cake for at least 1 hour before slicing. This allows the layers to firm up and makes the cake easier to cut neatly.
Notes
For the best texture: Make sure the cake layers are completely cool before assembling.
For fresh cherries: Sweet or sour cherries can be used depending on your preferred flavor.
For frozen cherries: They can be cooked directly from frozen; simply allow the filling to thicken properly.
For a stable cake: Keep the whipped cream cold and refrigerate the assembled cake before serving.
For clean slices: Use a sharp serrated knife and wipe the blade between cuts.
Storage: Keep covered and refrigerated for up to 3 days.
Make ahead: The chocolate cake layers and cherry filling can be prepared ahead of time. The assembled cake can also be refrigerated several hours or overnight before serving.

Hi, I’m Clara, the creator of Barakala. I love sharing simple, comforting, and delicious recipes that make everyday cooking easier and more enjoyable for home cooks.